How to set up your Rails + Preact app's routing
In the previous post in this series, we created a Rails app that renders a Preact frontend. In this post we’ll be taking a deeper look at how routing works in Ruby on Rails, and how we can simplify it using preact-router.
Understanding Rails’ MVC pattern
Ruby on Rails uses the Model-View-Controller (MVC) architectural pattern. There are three parts to it:
- Model: for handling the data stored in your database
- View: the code that determines how your page is rendered
- Controller: the code that, depending on the route, defines which View to render and passes it data from the Model
So far we have created a “hello world” app with a View and a Controller (we aren’t storing any data yet so there is no Model). Let’s take a look at how the View-Controller interaction works.
Step-by-step walkthrough for Rails routing
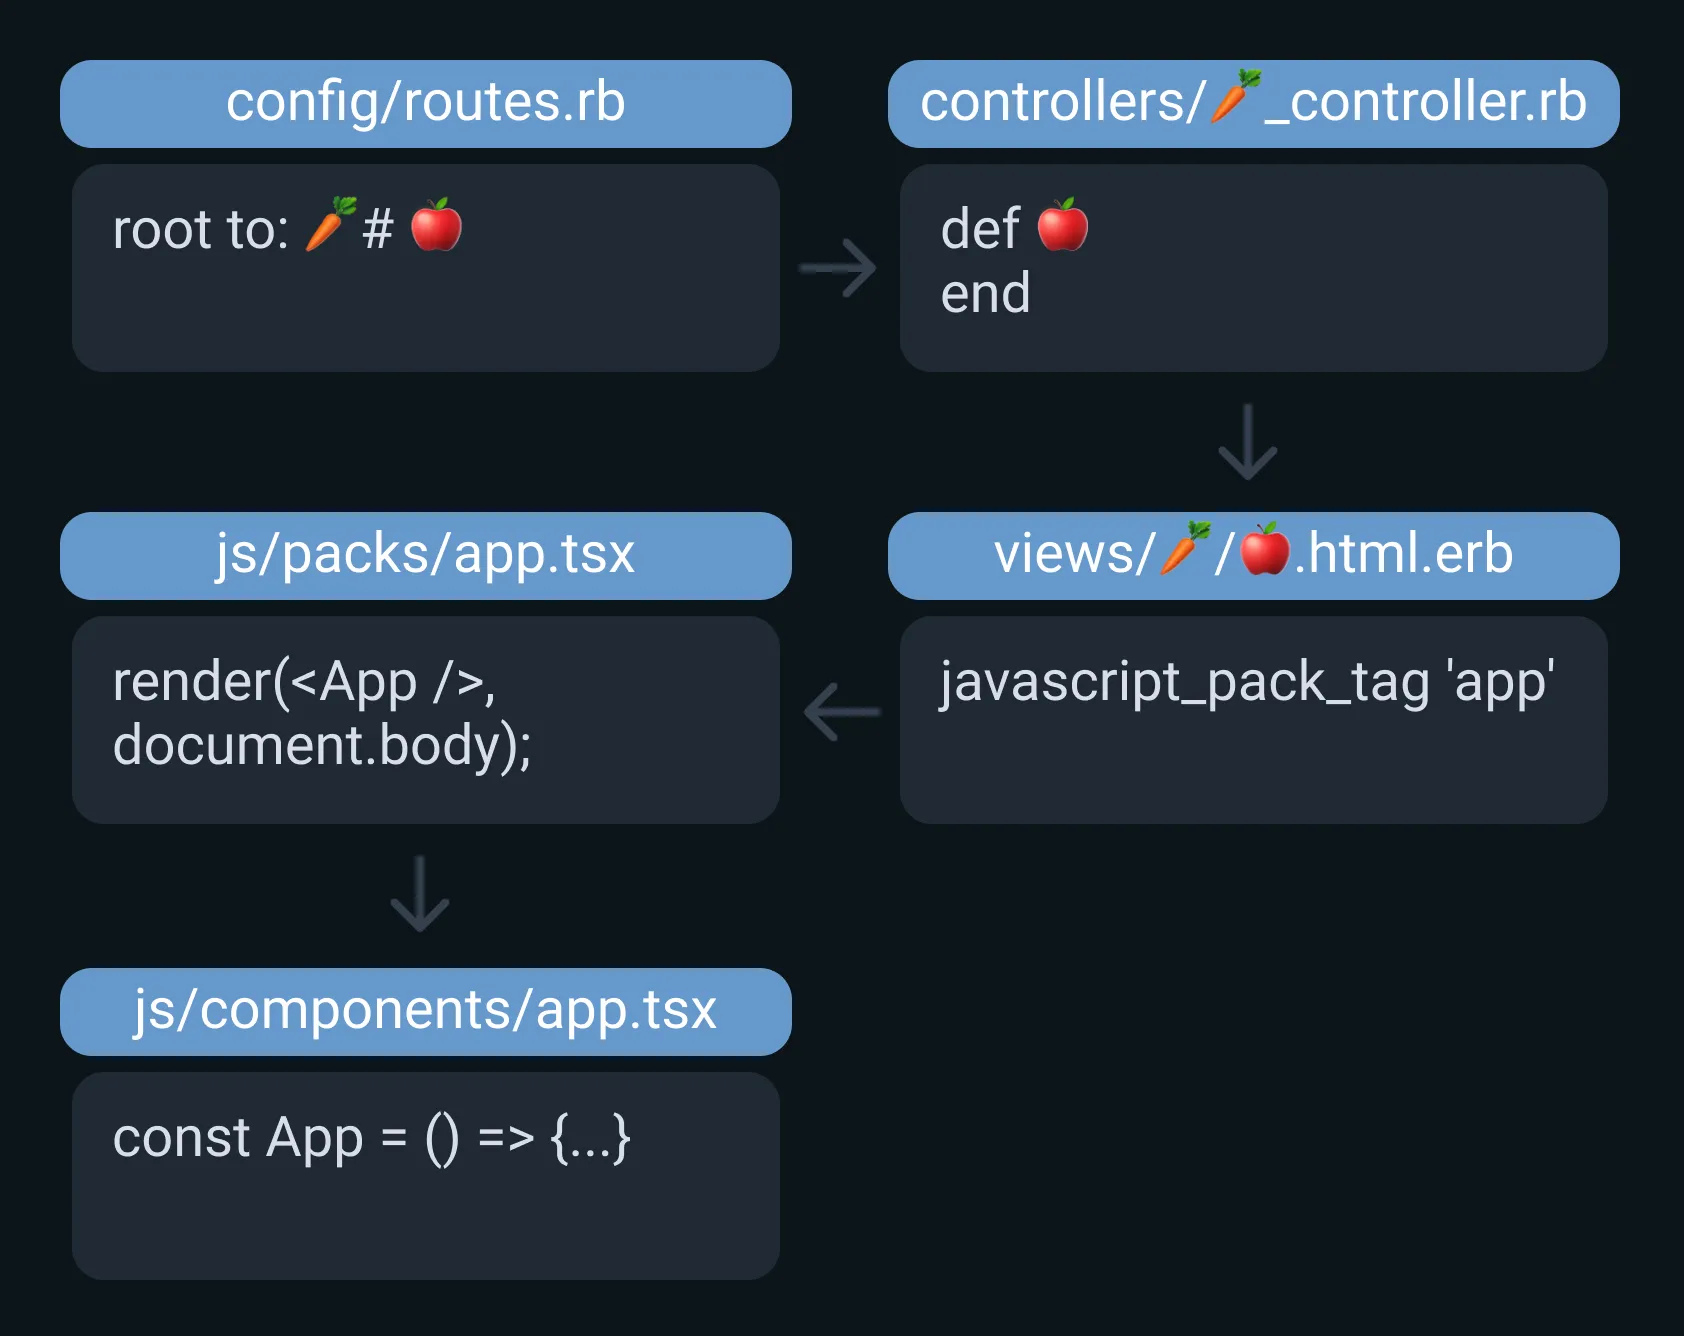
A key thing to remember is that file names matter! A lot of what happens below involves defining things in code that then link to specifically named files elsewhere
First we start at the routes file in our config folder:
# config/routes.rb
Rails.application.routes.draw do
    root to: 'hello#home' # matches pattern controller#action
end
Here we are defining that when we land on the home page of our site (root) we need to find the controller named hello with action named home.
This will look for a controller file that lives at <controller_name>_controller.rb:
# app/controllers/hello_controller.rb
class HelloController < ApplicationController
    def home # action name
    end
end
Inside of our HelloController we are defining our action called home.
This in turn links to the view file that lives at views/<controller_name>/<action_name>.html.erb:
# app/views/hello/home.html.erb
<%= javascript_pack_tag 'hello_preact' %>
In this HTML file we have our JavaScript pack file hello_preact, which is responsible for rendering our Preact app. We can find this at javascript/packs/<pack_file_name>.tsx:
// app/javascript/packs/hello_preact.tsx

import { render, h } from 'preact';

const Hello = () => (
    <div>Hello world!</div>
)

document.addEventListener('DOMContentLoaded', () => {
    render(<Hello />, document.body);
});
If you’re still a bit confused, I’ve created a simplified diagram for this process here:
Simplifying the process with preact-router
With the above approach, for every given route, a controller would need to be mapped to a different view file, and different Preact app. We can instead let our Preact app handle all the routing using preact-router.
Loading the same Preact app on every page
In our routes file we can add a new line:
# config/routes.rb
Rails.application.routes.draw do
    root to: 'hello#home'
    get '/*path' => 'hello#home' # All pages will be redirected here!
end
This /*path is a wildcard that will match on any route. Effectively we’re telling Rails to always use the same controller and action.
Adding preact-router
Next we need to install preact-router:
yarn add preact-routerThen in our pack file, we will replace our component with a preact-router component:
// app/javascript/packs/hello_preact.tsx

import { Router, Route } from 'preact-router';
import { h, render } from 'preact';

import Home from '../components/home';
import About from '../components/home';

const App = () => (
    <Router>
        <Route path="/" component={Home} />
        <Route path="/about" component={About} />
    </Router>
);

render(<App />, document.body);
For each route in our app, we will need a new Route component where we pass in the component we want to render on that route.
You’ll notice that there are two new components - Home and About. They should look something like this:
// app/javascript/components/home.tsx

import { h } from 'preact';
import { Link } from 'preact-router';

const Home = () => (
    <div>
        <div>Hello world</div>
        <Link href="/about">About page</Link>
    </div>
);

export default Home;
Now when we navigate between http://localhost:3000 and localhost:3000/about, we will be able to see our Home and About components rendered respectively.
Although ultimately we are not using the Controller-View pattern the way it would be used in a traditional Rails app, I hope this post has helped you to better understand how routing with Rails works. The next post in this series will explore the Model part of MVC, and how we can fetch data from our Rails app with Preact.
Happy coding!